Open topic with navigation
Skorpio Scanner Configuration Guide
This document provides an overview of the final configuration and maintenance of the Skorpio handheld scanner device used in conjunction with AXIS™ Retail Management System software.
Overview
Complete the following procedures to complete the configuration of a Retailer's Skorpio scanner for use with the AXIS system.
Note: These procedures may be completed after the scanner has been set up and associated software has been installed and configured. Refer to the Skorpio Scanner Setup Guide for more information.
- Install MyMobile Software
- Upgrade Firmware
- Configure the Scanner
If necessary, refer to Troubleshooting for additional information.
Install MyMobile Software
- Contact the Retailer to verify that scanner device has been setup and is in the dock.
- Remote connect to the Retailer's workstation.
- Copy the MyMobiler125_02072010 folder from the G drive (G:\Customer_Care\Shared\AXIS Wireless\MyMobiler125_02072010) to the Retailer's workstation.
-
Double-click the MyMoblier123_02072010.exe file on the Retailer's workstation to display a dialog window.
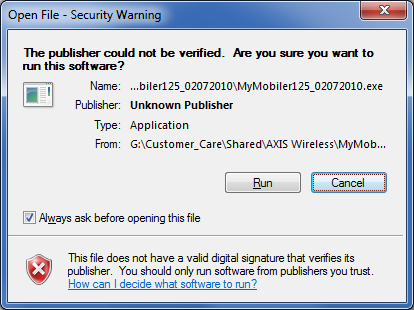
-
Click the Run button to display the MyMobiler v1.25 Setup window.

- Click the Next button (or otherwise accepts default settings) on this and each following page in this window to display the MyMobile folder on the workstation's desktop.
- Copy the remote.exe.50 file from the MyMobiler125_02072010 folder to the workstation's desktop.
- Copy the MyMobile icon from the MyMobile folder to the workstation's desktop.
-
Double-click the MyMobile icon to launch the program.
Note: Observe the color of the program's icon in the taskbar's notification area. If the icon is blue, the scanner is properly situated in the dock. (If the icon is not blue, the scanner may need to be reset in the dock.)
-
Right-click the program's icon in the taskbar's notification area to display a menu.
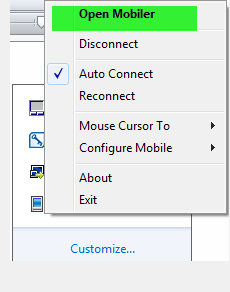
- Click the Open Mobiler option to display the scanner screen on the workstation.
- Next, Upgrade Firmware.
Upgrade Firmware
Complete the following procedure to upgrade the scanner's firmware to v1.94.
- Navigate to the Datalogic Firmware Utility Version 4.8.12.0.
- Download the file to the Retailer's workstation and unzip it.
- Run the program to install it.
- Navigate to SX3WM English Firmware Image 1.94.
- Download the file to the Retailer's workstation and unzip it.
- Make sure the scanner and dock are connected to the workstation.
-
Open the Datalogic Firmware Utility (DFU) program to display the Datalogic Firmware Utility window.
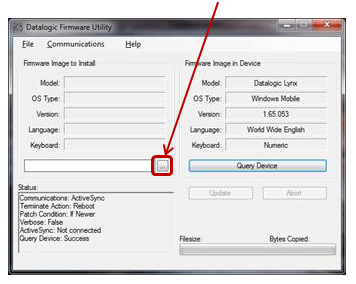
- Click the Browse button to navigate to and select the firmware.
- Click the Update button to start the update process. A confirmation notice appears when the upgrade is complete.
- Next, Configure the Scanner.
Configure the Scanner
Complete the following procedure to configure the scanner.
-
Select Start > Settings > System > Backlight to display the Backlight menu.
Note: A shorthand reference like this indicates the user should 1) click the Start button to display the Start menu, 2.) click the Settings icon to display the Settings menu, 3) click the System icon to display the System menu, and 4) click the Backlight icon to display the Backlight menu.

- Click the Auto-Off tab to display it.
- Select "5 minutes" from both drop-downs.
- Click the OK button to save settings.
-
Select Start > Settings > System > Decoding to display the Decoding Properties menu.

- Click the Config button.
- Select 1D Bar Code and Codebar.
- Verify all settings for Enable Checksum and Send Check Digit are selected.
- Use arrow keys as needed to navigate to all pages.
- Click the OK button to save settings.
-
Select Start > Settings > System > Power to display the Power menu.
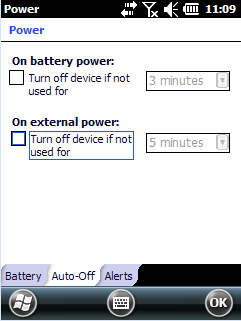
- Uncheck both options.
- Click the OK button to save settings.
-
Before proceeding, verify the retailer has configured the scanner for wireless communications.
Note: For more information, refer to Establish a Wireless Connection in the Skorpio Scanner Setup Guide.
-
Select Start > Settings > Connections > SCU to display the Summit Client Utility menu.

- Click the Main tab to display it.
- Click the Off selection button for the Auto Profile setting.
-
Click the Profile tab to display it.
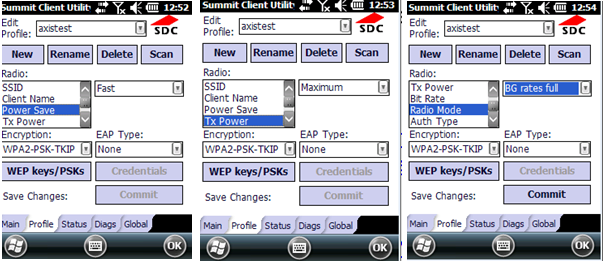
- Set the Power Save option to "Fast" with the drop-down.
- Set the TX Power option to "Maximum" with the drop-down.
- Set the Radio Mode option to "BG rates full" with the drop-down.
- Click the OK button to save settings.
-
Click the Global tab to display it.
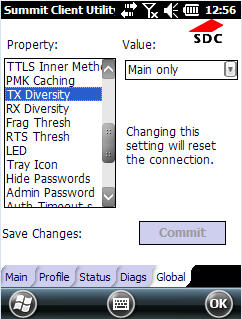
- Set the TX Diversity option to "Main Only" with the drop-down.
- Set the RX Diversity option to "Main Only" with the drop-down.
- Click the OK button to save settings.
Troubleshooting
Warm Boot the Scanner
In the event the scanner becomes unresponsive, complete the following procedure to warm boot the scanner.
Note: A warm boot terminates an unresponsive application and clears the working RAM, but preserves the file system. The registry will be restored from persistent memory if available or returned to factory default.
-
Locate the yellow, blue, and ESC buttons on the scanner.

- Press and hold all three keys simultaneously to reboot the scanner and display the home screen.
Clean Boot the Scanner
In the event the scanner cannot be restored with a warm boot, complete the following procedure to clean boot the scanner.
Note: A clean boot restores the scanner to its original factory settings and removes all custom settings and installed apps.
- Remove the battery.
-
Locate the ESC button on the scanner and the Reset button in the battery compartment.
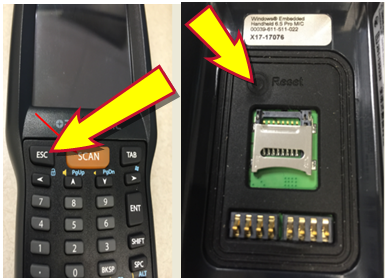
- Press and hold both buttons simultaneously for 10 seconds.
- Replace the battery.
-
Locate the 0 (zero) and ESC buttons on the scanner.
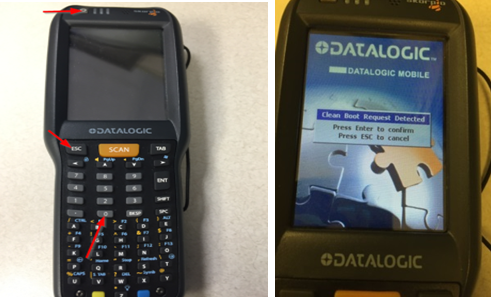
- Press and hold both buttons.
- While holding the buttons down, press and release the Power button to display a clean boot message on the scanner's screen.
- Press the ENT button to confirm and start the clean boot. The device automatically restarts when the boot is complete.
|

|
|
|
© 2015 AcuSport Corporation
All rights reserved
 More: More:
|
|
|
About AcuSport RTG
|
About AcuSport RTG Product Support
Email: RTGSupport@AcuSport.com
Phone: 800.547.7120 or 320.252.5355
Fax: 800.322.4213
Support Hours:
Monday - Friday 7:00 a.m. - 9:00 p.m. Central Time
Saturday 8:00 a.m. - 5:00 p.m. Central Time
|
Open topic with navigation