Open topic with navigation
Skorpio Scanner Setup Guide
This document provides an overview of the setup, installation, configuration, and maintenance of the Skorpio handheld scanner device used in conjunction with AXIS™ Retail Management System software.
Overview
Complete the following procedures as directed to prepare your Skorpio scanner for use with the AXIS system.
- Connect the Scanner Dock to a Workstation
- Install Mobile Device Software
- Configure Mobile Device Software
- Establish a Wireless Connection
- Contact RTG Support for Further Assistance
If necessary, refer to Troubleshooting for additional information.
Connect the Scanner Dock to a Workstation
Complete the following procedure to connect the Skorpio X3 Single Slot Dock to an AXIS workstation and to a power supply.
-
Remove the scanner from the dock and keep it out until instructed otherwise.
Note: Do not connect the Micro USB cable to the dock when the scanner is in the cradle.
- Connect one end of the Micro USB cable to the dock.
- Connect the other end of the Micro USB cable to the workstation's USB port.
- Connect the power adapter's plug to a secure, grounded power strip.
- Next, Install Mobile Device Software.
Install Mobile Device Software
Complete the following procedure to download and install the Windows Mobile Device Center application on the AXIS workstation.
-
Determine the workstation's system type (32-bit or 64-bit).
Note: If needed, complete the following to display the system type:
- Press the Windows key (or click the Start button on the Windows taskbar) to display the Start menu.
- Right-click the Computer option to display a menu.
-
Click the Properties option in the menu to display an informational window.
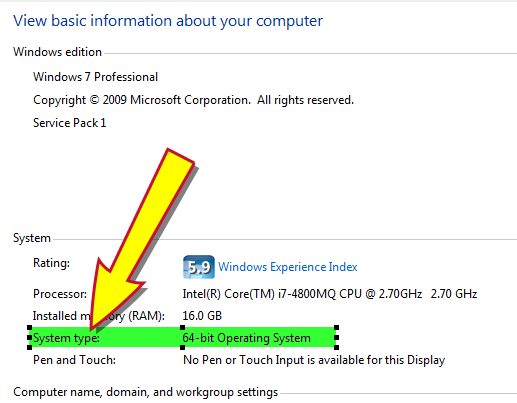
-
The system type is located beside the System type heading.
-
Use the workstation's web browser to access the appropriate application download page:
- Verify that "English" is selected in the Select Language drop-down on the download page.
-
Click the Download button to display a run/save dialog box.

- Click the Run button to start the installation process.
- When the process finishes, Configure Mobile Device Software.
Configure Mobile Device Software
Complete the following procedure to configure the Windows Mobile Device Center application.
- Press the Windows key (or click the Start button) to display the Start menu.
- Click the All Programs option to display a list of all programs.
-
Click the Windows Mobile Device Center option to open the program window.
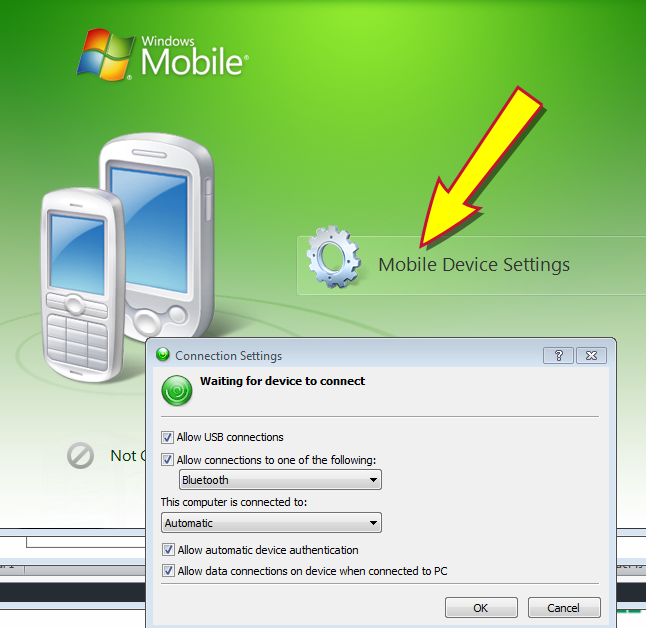
- Click the Mobile Device Settings option to display the Connection Settings window.
- Make sure all check boxes are checked. (All other controls may be left at default settings.)
- Click the OK button to close the window.
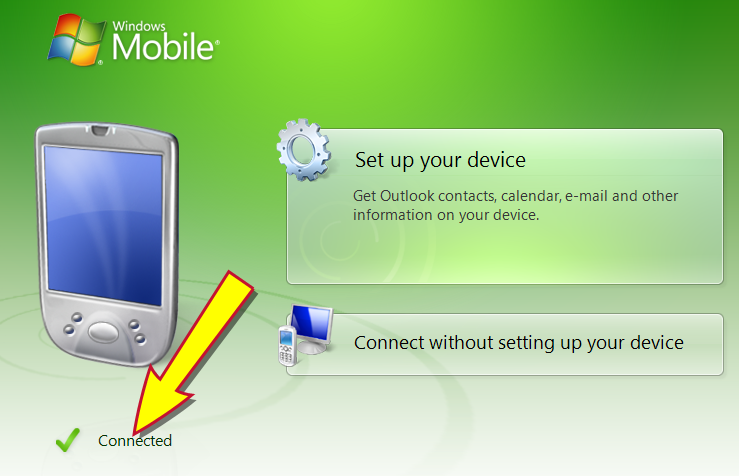
- Place the scanner in the docking station to display a registration prompt.
-
Click the Don’t Register option to close the prompt and display a Connected note on the Windows Mobile Device Centerwindow.
- Next, Establish a Wireless Connection.
Establish a Wireless Connection
Complete the following procedure to establish a wireless connection between the scanner and the dock.
-
Remove the scanner from the dock to display its onscreen menu.
-
Using the stylus, tap the Start button to display the Start menu.

-
Tap the Settings icon to display the Settings menu.

-
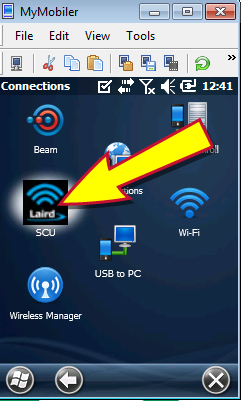
Tap the Connections icon to display the Connections menu.
-
Tap the SCU icon to display the Summit Client Utility menu.

- Tap the Profile tab to display it.
-
Tap the Scan button to display a list of network SSIDs.
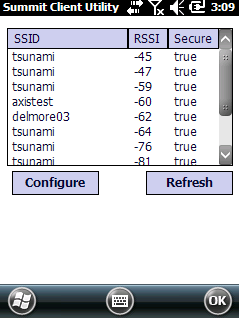
- Select the appropriate wireless network SSID.
-
Click the Configure button to begin the configuration process and display a profile creation prompt.
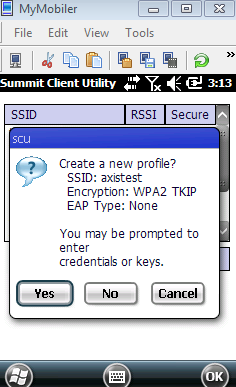
- Click the Yes button to display credential entry fields.
- Enter the appropriate wireless security pass phrase.
- Tap the Commit button to continue the configuration process.
- Tap the Main tab to display it.
- Select the chosen wireless network SSID from the Active Profile drop-down.
- Next, Contact RTG Support for Further Assistance.
Contact RTG Support for Further Assistance
After completing the scanner setup procedures (connecting the dock to the workstation, installing and configuring mobile device software, and establishing wireless connections), contact RTG Support Line to arrange for post-setup configuration.
Troubleshooting
Warm Boot the Scanner
In the event the scanner becomes unresponsive, complete the following procedure to warm boot the scanner.
Note: A warm boot terminates an unresponsive application and clears the working RAM, but preserves the file system. The registry will be restored from persistent memory if available or returned to factory default.
-
Locate the yellow, blue, and ESC buttons on the scanner.

- Press and hold all three keys simultaneously to reboot the scanner and display the home screen.
|

|
|
|
© 2015 AcuSport Corporation
All rights reserved
 More: More:
|
|
|
About AcuSport RTG
|
About AcuSport RTG Product Support
Email: RTGSupport@AcuSport.com
Phone: 800.547.7120 or 320.252.5355
Fax: 800.322.4213
Support Hours:
Monday - Friday 7:00 a.m. - 9:00 p.m. Central Time
Saturday 8:00 a.m. - 5:00 p.m. Central Time
|
Open topic with navigation